How to Apply Press-On Nails Without Getting Hair Caught
Why do nails get hair caught?
It’s simple: because of gaps.
Anyone who has done gel nails knows that chipped gel can sometimes snag hair. The same principle applies to press-on nails: no gaps mean no snagging. Follow these steps to avoid hair tangles and ensure long-lasting nails:
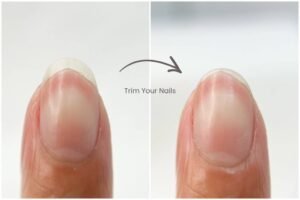
- Trim Your Nails
Cut your nails as short as possible without causing pain.

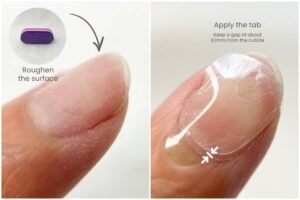
- Buff the Nail Surface
Use a sponge buffer (included with your press-on nails) to roughen the nail surface. Buff in one direction only, for example, from left to right, and avoid back-and-forth motions.

- Dry the Nail Surface
Use an alcohol wipe (included with your press-on nails) to dry the nail surface. - Choose the Right Adhesive Nail Tabs
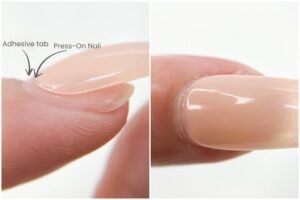
Select adhesive nail tabs that match your nail size (included with the nails). Apply the tab to your nail, keeping a gap of about 0.1mm from the cuticle (the gap shown in the photo is slightly exaggerated, please forgive us 🙇🏻♀️). Smooth out the adhesive to remove all air bubbles, then peel off the protective film.

- Apply the Press-On Nail at a 45-Degree Angle
Place the press-on nail at a 45-degree angle on the adhesive tab (leave about 0.5mm of the tab exposed). Do not press down yet.

- Secure the Press-On Nail
Once the press-on nail is correctly positioned, press it down at a 45-degree angle towards the cuticle while pushing it in. Press down on the entire nail for 5-10 seconds, including the sides.
Additional Tips:
- If your natural nails have a flatter curvature, apply an extra piece of smaller adhesive nail tab to the center of the nail (creating a double layer) for a more comfortable fit and to prevent pinching.
- Apply the nails in the following order: middle finger, ring finger, pinky finger, index finger, and thumb last.
- For spoon-shaped nails (curved downwards), apply additional adhesive nail tabs. The fewer gaps between your natural nail and the press-on nail, the better the fit and durability.
How to Remove Press-On Nails

- Soak in Warm Water
Soak your nails in warm water for five minutes. It’s even better to remove the nails after a bath. - Use a Cuticle Stick
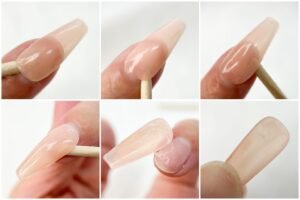
Use the cuticle stick included with your press-on nails (it looks like a small wooden stick) to gently remove the nails. - Separate the Adhesive Nail Tab
Insert the cuticle stick between your natural nail and the press-on nail, gently separating the adhesive nail tab. Move the stick in a U-shape motion, repeating this action until the entire press-on nail loosens and can be removed. - Clean Off Residue
Remove any remaining adhesive from your natural nail and the press-on nail. - Reuse Your Press-On Nails
Properly removed press-on nails can be reused multiple times! However, forcibly removing them might damage them, making them unusable after just one use. Isn’t that super cost-effective? ❤️
